Set up Nginx Ingress with Proxy Protocol on DigitalOcean
Set up Nginx Ingress with Proxy Protocol on DigitalOcean

Introduction
Kubernetes Ingresses allow you to flexibly route traffic from outside your Kubernetes cluster to Services inside of your cluster. This is accomplished using Ingress Resources, which define rules for routing HTTP and HTTPS traffic to Kubernetes Services, and Ingress Controllers, which implement the rules by load balancing traffic and routing it to the appropriate backend Services. Popular Ingress Controllers include Nginx, Contour, HAProxy, and Traefik. Ingresses provide a more efficient and flexible alternative to setting up multiple LoadBalancer services, each of which uses its own dedicated Load Balancer.
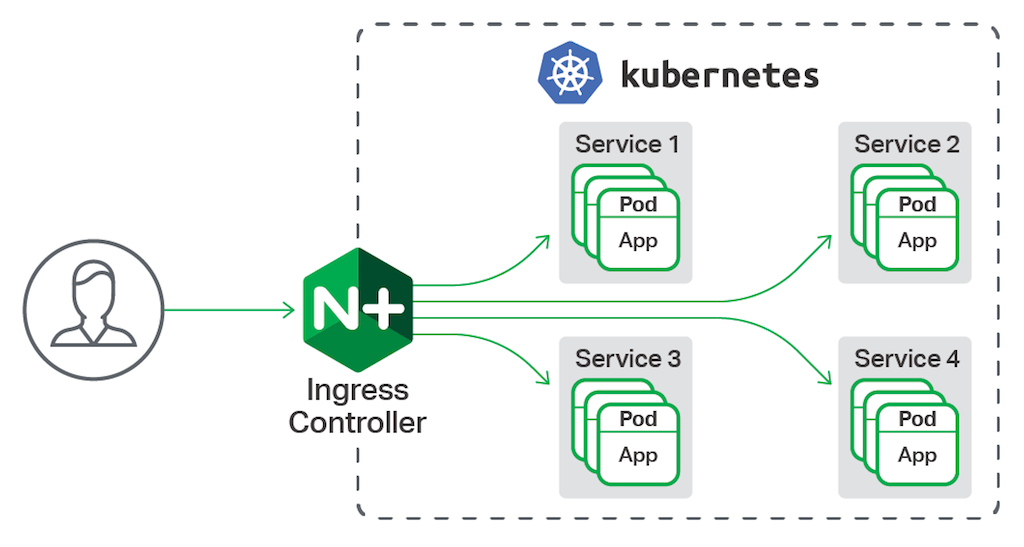
In this guide, we’ll set up the Kubernetes-maintained Nginx Ingress Controller, and create some Ingress Resources to route traffic to several dummy backend services. The architecture will look like:
Prerequisites
Before you begin with this guide, you should have the following available to you:
- A Kubernetes 1.10+ cluster
- The
kubectlcommand-line tool installed on your local machine and configured to connect to your cluster. You can read more about installingkubectlin the official documentation. - A domain name and DNS A records which you can point to the DigitalOcean Load Balancer used by the Ingress. (You will do this manually after setting up the Nginx ingress controller as it will automatically create a DigitalOcean load balancer and give it a public IP. You will then need to create an A record to point to that IP).
Step 1 — Setting Up Dummy Backend Services
Before we deploy the Ingress Controller, we’ll first create and roll out two dummy echo Services to which we’ll route external traffic using the Ingress. The echo Services will run the hashicorp/http-echo web server container, which returns a page containing a text string passed in when the web server is launched. To learn more about http-echo, consult its GitHub Repo, and to learn more about Kubernetes Services, consult Services from the official Kubernetes docs.
On your local machine, create and edit a file called http-echo.yaml using vim or your favorite editor:
apiVersion: v1
kind: Service
metadata:
  name: http-echo
spec:
  ports:
  - port: 80
    targetPort: 5678
  selector:
    app: http-echo
---
apiVersion: apps/v1
kind: Deployment
metadata:
  name: http-echo
spec:
  selector:
    matchLabels:
      app: http-echo
  replicas: 2
  template:
    metadata:
      labels:
        app: http-echo
    spec:
      containers:
      - name: http-echo
        image: hashicorp/http-echo
        args:
        - "-text=httpecho"
        ports:
- containerPort: 5678In this file, we defined a Service called http-echo which routes traffic to Pods with the app: http-echo label selector. It accepts TCP traffic on port 80 and routes it to port 5678,http-echo’s default port.
We then define a Deployment, also called http-echo, which manages Pods with the app: http-echo Label Selector. We specify that the Deployment should have 2 Pod replicas, and that the Pods should start a container called http-echo running the hashicorp/http-echo image. We pass in the text parameter and set it to httpecho, so that the http-echo web server returns httpecho. Finally, we open port 5678 on the Pod container.
Once you’re satisfied with your dummy Service and Deployment manifest, save and close the file.
Then, create the Kubernetes resources using kubectl apply with the -f flag, specifying the file you just saved as a parameter:
$ kubectl apply -f http-echo.yaml
You should see the following output:
service/http-echo created
deployment.apps/http-echo created
Verify that the Service started correctly by confirming that it has a ClusterIP, the internal IP on which the Service is exposed:
$ kubectl get svc http-echoYou should see the following output:
NAME       TYPE        CLUSTER-IP       EXTERNAL-IP   PORT(S)   AGE
http-echo  ClusterIP   10.245.222.129   <none>        80/TCP    60s
Now that our dummy echo web service are up and running, we can move on to rolling out the Nginx Ingress Controller.
Step 2 — Setting Up the Kubernetes Nginx Ingress Controller
Now you’ll install the Kubernetes-maintained Nginx Ingress Controller using Helm. Note that there are several Nginx Ingresses.
The Nginx Ingress Controller consists of a Pod and a Service. The Pod runs the Controller, which constantly polls the /ingresses endpoint on the API server of your cluster for updates to available Ingress Resources. The Service is of type LoadBalancer, and because you are deploying it to a DigitalOcean Kubernetes cluster, the cluster will automatically create a DigitalOcean Load Balancer, through which all external traffic will flow to the Controller. The Controller will then route the traffic to appropriate Services, as defined in Ingress Resources.
Each Helm chart has a default values.yaml where predefined default values will be injected in Helm templates to build the k8s resources needed to install the helm chart. You can run the helm install command to install the Nginx ingress as follows:
$ helm install stable/nginx-ingress --name nginx-ingress$ helm install nginx-ingress stable/nginx-ingressBut this will install the ingress with default values that does not support proxy-protocol out of the box.
To install the ingress withproxy-protocolyou will need to pass extra params to helm to configure Nginx to expect receivingproxy-protocolheaders and parse it.
Also, we will need to pass another extra param to configure DigitalOcean's load balancer to inject proxy-protocol headers when communicating with the Nginx ingress.
The helm install command with these values should look like:
$ helm install stable/nginx-ingress --name nginx-ingress --set controller.publishService.enabled=true --set-string controller.config.use-forward-headers=true,controller.config.compute-full-forward-for=true,controller.config.use-proxy-protocol=true --set controller.service.annotations."service\.beta\.kubernetes\.io/do-loadbalancer-enable-proxy-protocol=true"
$ helm install nginx-ingress stable/nginx-ingress --set controller.publishService.enabled=true --set-string controller.config.use-forward-headers=true,controller.config.compute-full-forward-for=true,controller.config.use-proxy-protocol=true --set controller.service.annotations."service\.beta\.kubernetes\.io/do-loadbalancer-enable-proxy-protocol=true"
The output will look like:
NAME:   nginx-ingress
LAST DEPLOYED: ...
NAMESPACE: default
STATUS: DEPLOYED

RESOURCES:
==> v1/ConfigMap
NAME                      DATA  AGE
nginx-ingress-controller  1     0s

==> v1/Pod(related)
NAME                                            READY  STATUS             RESTARTS  AGE
nginx-ingress-controller-7658988787-npv28       0/1    ContainerCreating  0         0s
nginx-ingress-default-backend-7f5d59d759-26xq2  0/1    ContainerCreating  0         0s

==> v1/Service
NAME                           TYPE          CLUSTER-IP     EXTERNAL-IP  PORT(S)                     AGE
nginx-ingress-controller       LoadBalancer  10.245.9.107   <pending>    80:31305/TCP,443:30519/TCP  0s
nginx-ingress-default-backend  ClusterIP     10.245.221.49  <none>       80/TCP                      0s

==> v1/ServiceAccount
NAME           SECRETS  AGE
nginx-ingress  1        0s

==> v1beta1/ClusterRole
NAME           AGE
nginx-ingress  0s

==> v1beta1/ClusterRoleBinding
NAME           AGE
nginx-ingress  0s

==> v1beta1/Deployment
NAME                           READY  UP-TO-DATE  AVAILABLE  AGE
nginx-ingress-controller       0/1    1           0          0s
nginx-ingress-default-backend  0/1    1           0          0s

==> v1beta1/Role
NAME           AGE
nginx-ingress  0s

==> v1beta1/RoleBinding
NAME           AGE
nginx-ingress  0s

NOTES:
...
You can watch the DigitalOcean Load Balancer become available by running:
$ kubectl get services -o wide -w nginx-ingress-controllerTo validate that the DigitalOcean Load Balancer has the proxy-protocol option enabled go to DigitalOcean Dashboard -> Networking -> Load Balancers -> Edit Settings and you should see the following option enabled:

Also to validate that Nginx is correctly configured to receive proxy-protocol requests, you can run the following command:
$ kubectl -n default describe configmap nginx-ingress-controllerproxy-protocol is enabledThe output should look like:
Name:         nginx-ingress-controller
Namespace:    default
Labels:       <none>

Data
====
compute-full-forwarded-for:
----
true
use-forwarded-headers:
----
true
use-proxy-protocol:
----
trueStep 3 — Exposing the App Using an Ingress
Let’s begin by creating a minimal Ingress Resource to route traffic directed at a given subdomain to a corresponding backend Service.
In this guide, we’ll use the test domain example.com. You should substitute this with the domain name you own.
Begin by opening up a file called echo_ingress.yaml in your favorite editor and paste in the following ingress definition:
apiVersion: networking.k8s.io/v1beta1
kind: Ingress
metadata:
  name: echo-ingress
spec:
  rules:
  - host: echo.example.com
    http:
      paths:
      - backend:
          serviceName: echo-http
servicePort: 80When you’ve finished editing your Ingress rules, save and close the file.
Here, we’ve specified that we’d like to create an Ingress Resource called echo-ingress, and route traffic based on the Host header. An HTTP request Host header specifies the domain name of the target server. To learn more about Host request headers, consult the Mozilla Developer Network definition page. Requests with host echo.example.com will be directed to the echo-http backend set up in Step 1.
You can now create the Ingress using kubectl:
$ kubectl apply -f echo_ingress.yamlYou’ll see the following output confirming the Ingress creation:
ingress.extensions/echo-ingress createdTo test the Ingress, navigate to your DNS management service and create A records for echo.example.com pointing to the DigitalOcean Load Balancer’s external IP. The Load Balancer’s external IP is the external IP address for the ingress-nginx Service, which we fetched in the previous step.
At this point, you’ve successfully set up a minimal Nginx Ingress to perform virtual host-based routing. So now you can visit echo.example.com and you should see the text defined in Step 1 httpecho.
DNS records may take up to 48 hours (usually it takes few minutes) to propagate to all DNS servers around the world, your ISP provider, network and computer so be patient.
In this guide, you set up an Nginx Ingress to load balance and route external requests to backend Services inside of your Kubernetes cluster.
There are many alternatives to the Nginx Ingress Controller. To learn more, consult Ingress controllers from the official Kubernetes documentation.
Happy Helming with Kubernetes ⎈ on DigitalOcean 🌊!